Pro Tools How to Bounce Individual Tracks as Individual Files
There are a number of reasons why you will want to bounce (export) individual tracks from your session in Pro Tools. This process is also known as bouncing individual stems. You may be sharing files with someone using a different DAW, or you may want to simplify your session if you're working with a lot of tracks. Bouncing an individual track makes it easy to do both of these.
There are a few steps to the process, in this article we'll talk through and explain each of the steps.
1. Add Cross Fades
If you've recorded multiple takes and punched sections into the song or done any timing edits to your audio files, you need to make sure you crossfade between each audio block. You may have done this as you've worked through your recording and editing process. But it's a good idea to make sure and add any that are missing to avoid pops and clicks that could be heard between audio files that are cut off without fades.
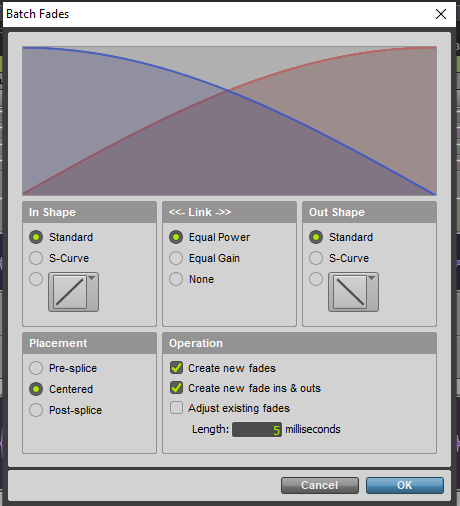
There's a tool in Pro Tools called Batch Fades that allows you to add crossfades between all audio clips in your project. To use this tool, first click the icon in the bottom right corner of the screen to pop out the left sidebar if it's not already visible. You'll see the 'Groups' editor in the bottom left portion of this sidebar. Click the top option labelled '<ALL> to activate the group for all tracks.

Now move the cursor to the beginning of the song, (or hit the main enter key) and select the whole song by clicking and dragging to the end of the song and selecting all audio tracks in your project.
Now bring up the Batch Fades window using Cmd+F on a Mac or Ctrl+F on a PC. Select the 'Create new fades' check box and 'Create new fade ins & outs.
Leave the 'Adjust existing fades' unchecked so this won't overwrite any manual fades you've set up.
Set the 'Length' to 5 milliseconds – that seems to work about right for most fades.
Then click OK.
We've now created any new fades needed and we can be confident that all the audio tracks are faded correctly, avoiding clicks and pops
2. Consolidate Audio clips
If your track is made up of multiple different audio blocks, you want to consolidate these clips so each track just has one solid audio block.
If you've been editing timing, or splicing multiple takes together, your track could have a number of different blocks of audio. You'll want to join them all together into one track, which makes it easier to work with. It's also easier to import into another DAW – as you can just line a consolidated clip up with the beginning of the session.
Highlight the full length of the song.
To consolidate all clips on a track, drag your cursor to select all the blocks of audio – make sure you drag your cursor all the way to the beginning of the timeline, so your consolidated clip will line up with the beginning of the project if you're importing into a new session or a different DAW.
Also make sure that your selection goes all the way to the end of the song.
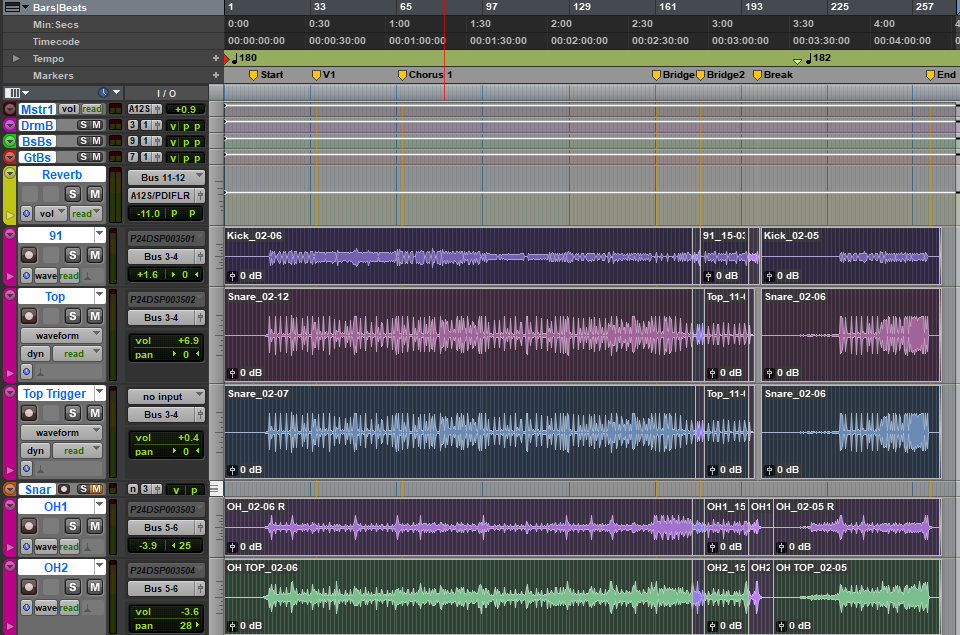
Once your track is selected (or you can do multiple tracks at once), go to the edit menu and select the 'consolidate clip' option. Or you can use Ctrl+Shift+3 on a PC or 'Alt+shift+3' on a Mac.
Pro Tools will now render all of the tracks to audio files that will be the exact same length, so you can drop them all into another DAW, or start a new clean session. If you didn't do this step you would have a whole bunch of random audio clips – it would be almost impossible to line them all up into the correct position in a new session or a different DAW!
Your consolidated clips will now appear like this.
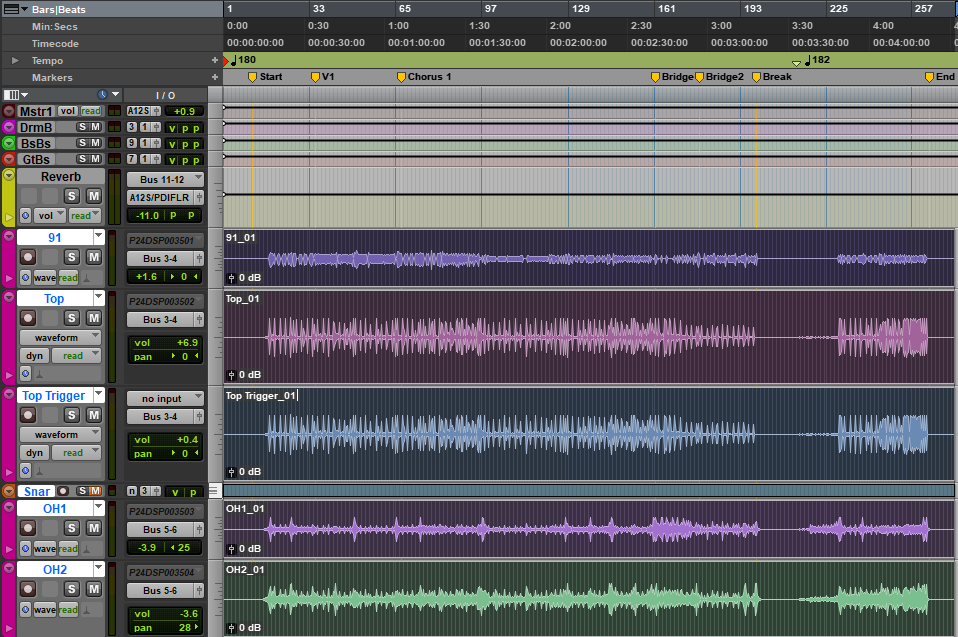
This makes the tracks much easier to manage for mixing – and can speed up performance as your playback engine has a smaller number of files to read.
3. Export Clips as files
Now with the new consolidated audio files selected, go to the file menu, select the 'Export' sub-menu and click 'Selected Tracks as NEW AAF/OMF…'. You can also use Cmd + Shift + K on a Mac or Ctrl + Shift + K on a PC.

This will bring up the Export Window as below.

Usually, you will match the settings of your export to the recording session. In the example I'm using, the Bit Depth is 24-bit and the Sample rate is 44.1kHz.
Here are the options you have for the Export window
- File Type
Pro Tools gives you the option of exporting as a WAV file, an AIFF or an MP3. WAV or AIFF retain the highest audio quality while the MP3 format adds compression to your audio file, reducing the file size, but also reducing quality. I recommend using WAV as it is most widely supported.
- Format
The file format options are 'Multiple Mono' or 'Interleaved'.If you have stereo tracks in your session then use the 'interleaved' option, otherwise 'Multiple Mono' is probably the best.
- Bit Depth
Bit depth refers to the resolution of the digital audio files that will be generated. The higher the bit depth, the more detailed the audio file will be. Higher bit depth also increases the file size. These days 24-bit is pretty standard, so most likely you'll use this option.
- Sample Rate
The sample rate refers to the number of unique pieces of audio that are carried in one second. 44.1Khz means that the file carries 44,100 unique samples in one second. 44.1Khz is CD quality – but often 48Khz is used these days or even up to 96Khz. Again the higher the sample rate, the larger the file size. If you're sending your files to someone else (like a mixing engineer) make sure their equipment can handle the sample rate – you could ask them what sample rate they prefer.
- Destination Directory
This setting gives you the option to select where you want your files to go. I suggest you create a new folder with a format something along the name of '{date}-{project name}-stem-export-{xx}bpm'. Then if your sharing this folder with someone else it's easy for them to see everything they need from the name.
- Duplicate File name options
I suggest leave the 'Prompting for each Duplicate' option checked. As you've selected a new folder in the step above duplicate file names shouldn't be an issue.
Click Export and wait for Pro Tools to complete the processing. It can take a while!
Once it's completed, It's a good idea to check that all the files are there in your output folder.
There you have it – the complete process for exporting individual tracks as stems from Pro Tools. Hope this was helpful for you!
Pro Tools How to Bounce Individual Tracks as Individual Files
Source: https://www.audioproductionroom.com/how-to-bounce-individual-tracks-as-stems-in-pro-tools/
0 Response to "Pro Tools How to Bounce Individual Tracks as Individual Files"
Post a Comment